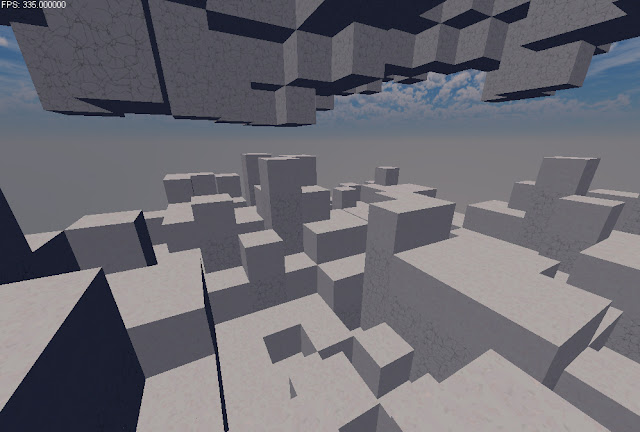
I thought I would add a couple textures so it wasn't just white. This is by no means a representation of what the landscape will look like even in the first playable launch.

I thought I would add a couple textures so it wasn't just white. This is by no means a representation of what the landscape will look like even in the first playable launch.

I has been a couple days, but it wasn't for working. After my day job tasks (senior programmer for a web marketing and development company started in 2003) were completed I kept working on Scavenge. Working on the landscape generation to be exact.
For now the Biome Generator is separated from the Landscape Generator for two reasons. 1) Easy to track bugs, and 2) I haven't implemented SQLite3 into the project yet. I didn't want to add another layer of difficulty right now. They are two separate systems (set of algorithms) anyways, and should be as self-contained as possible (ready for multithreading as well).
Soon, once I'm happy with the Landscape Generator I will bring in the biome results which will influence how each chunk would be formed. For now it's not needed to get started because I'm starting with a 16x16x384 chunk. 16x16x320 starts as "Air" and the remaining 16x16x64 starts as "Land" with 16x16x64 exactly marked as "visible/exposed." This is to help performance, but the future holds more of the performance optimization work. I mostly need to test and not have an FPS of 1.
Once I had that I wanted to be able to perform calculations and algorithms on the "chunk grid." I wanted to start with "cutting" land whenever I want to, in a "radius" (I have to use quotes because the world is made up of cubes, so there isn't much of a sphere or round shape), and at whatever level I want in the "world" that is, currently just a chunk.

Yep, it's a cube. Why is it a cube? I had "cut" a hole into the land, and everything outside of the hole is marked as "exposed." Here is inside the cube, or land.

As you can see, it's a "hole" and it's just part of the entire grid now. This hole in this example was set to a radius of 6, starting at layer/level 8. This is great, but I want to start generating interesting landscape, and ultimately caves and caverns. We will see how far I can get before I might have to seek help or advice from others willing.
Here is a simple noise (library provided by "SpiderPig" at Leadwerks/UltraEngine) algorithm thrown into the mix without much instruction.

You're like "whaaaat," and I'm like "right?" It does work. The top and bottom floor is the result of "exposure" or otherwise I wouldn't see that the top and bottom are working. This is a simple noise, added at layer 1, with a max layer of 6. I thought it was weird, but it's actually pretty cool once you go inside. It's kind of like a maze with no ending and a bunch of dead-ends.

Of course, you will have to mind the constant white block colors. I will eventually add textures. This would be a stone cave dead-maze anyways.
I added basic algorithms to be able to mix noise maps, and try to do something interesting.
The noise results are in range from -0.5 to 0.5. I have helper functions (currently stored in each layer to perform operations on its own layer and/or with a passed in grid or layer) to average point by point between layers or grids, smoothing and interpolation calculations point by point on itself, and in combination with a passed in grid or layer, and so forth.
A single smoothing operation gives me this result.

It looks the same, but now there seems to be more "room" compared to the other result. I need a 2D texture of the resulting blend to figure out what is going on exactly.


That explains why it seemed like there was more "room" inside the ceiling and ground. This is exactly what I wanted these operations to do, and now I can keep going.
Here is how the smoothing blended layers look as a new function I made that let's me directly insert chunks and grids (I should have mentioned earlier; a chunk is 16x16x384 and a grid is 16x16, a chunk is 3D and a grid is 2D) into the main chunk.

As we can see, this can represent as the ground. If we combine multiple layers they could be caves. I think? Can I get away with that?
However, this looks just... noisey. There doesn't seem to be any rhyme or reason to the blocks.
Time to try out a few more of the algorithm functions I made earlier, and I'm going to blend an averaging algorithm.

It might be hard to tell but each pixel is one "step" either higher or lower than it's neighbor. It tries it's best to anyway. Here is the 3D version.

As you may be able to see, again colors would help in the future, but each block has a neighbor that is only a block higher or lower. This looks way less chaotic.
How do I make this a cave?
For now, a simple: cut_ceiling()


These are uniform, and we don't want that. We need to fix that by shifting along the noise map, perform our operations, and then insert it into the landscape.


No longer uniform. That's one chunk though. I will fill the rest of the layers up to Sea Level and call it a day.

Until next time!
Thanks for reading!

To answer the question; Heightmaps
At least, it's in the near future, because the next step is heightmaps. Not just heightmaps, but layers of heightmaps, but there will be a limited layer amount. Similar to what I did with the Biome Generator, but with heightmaps, and different constraints or operations.
The image above is the first iteration of perlin noise, and it does not use a library. I am using STB to just save the image as a PNG file. Exact same method I used on the Biome Generator. This perlin noise is using 8 octaves, and a 0.1 bias. Here is 6 octaves, and a 0.1 bias:

I'm sure you get the point, it's the same as all other perlin noise implementations, and this will be the starting point of the heightmap generator for all of the biomes. I may experiment by blending the perlin noise with the biome map as the initial starting point, but that will have to wait for now.
Next I will have to work on C++ and LUA. Communication is important, since I need the generators to remain in C++, and I will also need to perform the generation in a thread. I may also use SQLite to store all of the data. I will need LUA to be able to either access SQL or my own classes that handle the data.
So much to do and so little time.
Until I have made final decisions about the core of the game, I knew that either way I will need to generate the map. As a lonewolf, it would be impossible for me to make large landscapes and manually sculpt it all, or even decorate with structures and items. If I plan to have large landscapes then I need to procedurally generate the landscape as much as possible.
My plan is to start with the Biomes. I want multiple biomes for the world; Oceans, Plains, Deserts, Forests, and Rocky Mountains. I also want Rivers throughout the lands, and high elevation Snowy Mountains. It all sounds great, but I need to get it done.
My idea was to generate an array of integers, based on a seed, and then perform blends with those integers. Each integer can represent a biome type. Zero for ocean, 1 for plains, 2 for deserts, and so forth. Let's start with just an empty map and generate a simple 0 or 1. 0 will be land, and 1 will be water.
I know it's really small, but I wanted to use a simple example to ensure everything is working fine. We have a small 16x16 image that represents the 0's and 1's generated from a seed. With simple math a 0 turns into the color black, and 1 turns into the color white. Here it is again but turning the 1's into a blue color to more clearly represent the water.
The concept seems simple enough. Now I want to manipulate this data, and I can do so in multiple ways. Essentially, while iterating through each data point (or pixel, as represented as an image), I can perform calculations, I can get neighboring data points and perform calculations together (an example is interpolating between the points for smoothing), and it becomes even more useful as a class.
As a class these can be considered Layers, and layers can be combined and/or they can perform specific actions to its own data, or in combination with another Layer's data. That was hard to write, but I hope it makes sense. Otherwise, I will write up a more technical article than this, as this is mostly just to present my progress, and share results.
For example, I created the initial map data as before, and called it "Island* island = new Island(1);" (a value of 1 in the parameter means to use the original seed, or seed * 1). Then I created another class, which extends BiomeLayer, and it creates map data using the island data; "Plain* plains = new Plain(1, island);" At this point, plains is my main map data, since it combines the island data with itself. However, this will give me the same results as before, so I'm going to add another layer; "Forest* forest = new Forest(1, plains);" - now to clarify:
I created a map with simple land/water data. I created another map, using that data, and assigned the biome type "Plains" to the land portion of the data. I created another map that uses the combined (land/water/plains) map data, and blends into the plains data the forest biome data. Each biome type is its own class, and can perform biome specific calculations to the set of data generated and/or given.
I increased the size to 256x256 so that there is more data to work with, and so it's easier to see on here. I started making "official" colors, so the water is blue, the plains are green, and the dark green is the forest. I had taken the color pallette from a Google search. These colors are only for representation of the data, but at the end of the day my game only needs the data as integers. These integers are just manipulated to determine the color of the pixels.

Now this looks way more fun! If this is all I wanted for my world then I would be set, but I want larger land masses, and oceans. This data is great, as you can see when you zoom into the map, these would be a lot of islands. I need to create a layer that handles zooming so that we can just capture a portion of the data, and then work with those results. Draw imaginary lines subdividing this square, and then imagine each of those as a "zoom," but we could do even more calculations depending on what we want to do, and then combine results.
For now, I'm having fun, and I'm going to add deserts.

Too much desert, but it works! The desert had taken over, so I will need to control that, or maybe just blend another plains layer. Time to work on zoom in-out, smoothing, and then I can have a smoothed zoom layer. I want to add more biomes as well so I can continue tweaking values and parameters.

I increased the size to 512x512. Zooming overall makes the water look like larger bodies of water, but it's still not good enough. What I could do is add a layer that removes the smaller "bodies of water" and then maybe increase the remaining water. I also didn't mean to use that color for the plains biome (maroon color). This pass was also an attempt to reduce the amount of deserts.

Not nearly as much desert now, and I mostly just added another layer of plains. Time to work on the oceans, and add more functionality to the zoom, smooth, interp., etc., functions of the layers.

Better, but kind of ugly. This almost makes me want to stop, but there is progress to be seen beyond the ugly. There are too many biomes smashed together for my eyes. The "Mesa" and "Snow" biomes are added, and thankfully they didn't take everything over like the Desert. The Mesa had kind of taken over in the areas I would like for there to be Ocean. Maybe I can take advantage of that, and maybe smooth out the biomes. I should use a "temperature map" to help determine biomes. Hot environments would have more desert, and cold environments will have more snow. The biomes need more space between them, and that could help organize the "land masses." I will create a temperature layer, or maybe just add a set of temperatures for the biomes, and compare temperatures when deciding biomes.

Definitely getting better. I'm not sure what's happening with the Mesa biomes. I believe the data is correct, but how I'm determining colors and saving the results as a PNG may be the culprit. The results are at least decent, but I will check the color output soon.

Well now I've done it! I don't know what I did to deserve these results. The red lines are an attempt at rivers but there are issues. The obvious one for me is, well, they shouldn't be red! This also looks zoomed by a hundred times. Time to troubleshoot my code, and my math; probably my life.

It's like the biomes got scared and left. Obviously, I messed up the layers, and I must have overwritten the main layer right before exporting the image. At least I hope.

Obviously it's something layer related. Time to triple-check my math, and I'm just going to rewrite the layers starting with the first land/water layer, temperature map, sigh.. Here we go...

SUCCESS!
There are biomes missing, but this is what I'm looking for! I will continue, but I would be more than happy to return to these results. This is exactly what I need to generate the landscape in Scavenge.
Multiple issues were the cause of the odd results earlier. I didn't show the results before this one, where it looked like the result with the red river lines (they were red again, so I looked at how I was creating the PNG data), and that result forced me to go over all of the biome classes with a fine-toothed-comb. I found many errors, some in my math on neighboring data points, and there was even an error in my function that selected random biomes after examining neighbors to determine its potential biome types.
I'm going to examine the missing biomes, but some are not present on purpose. I needed to figure out what was going on, and that was best with just a few biome layers. Also, did you notice the shore lines? That was easy to calculate since a data points neighbors had to be both "ocean" and any biome type. I had taken it further and made "frozen beach", "cold beach", "rocky beach", and a normal "beach".
I need to wrap up this article, so time to get back to work.
First, a huge THANK YOU to Alienhead Development Studio for providing me their source access from one of their previous game projects. I will definitely utilize the library of code to help develop my game in the Leadwerks engine.
Reviewing the project source gave me better access into the insights of developing a game with the Leadwerks engine than just reading API documentation. I will now be readjusting what I had been programming, and try to more directly get to actually making the game; not a game engine, not an editor; a game.
As I had warned in the beginning; I may end scratching everything and starting over. It was foreshadowing, I didn't even know, but I knew it was very possible because I'm new to the engine. I'm also new to LUA, I've only dabbled with it, but never tried to expose C++ to LUA and communicate. I'm very novice with LUA.
Until next update!
There is already a class named "Window" in Leadwerks (and probably every other game engine out there), so I first called this camera class a "CameraManager" but I ended up renaming it to "Director" because a director controls the scene (via camera) and because it's a shorter name. I'll be honest about that part.
List of classes at this time:
Scavenge
Game
Settings
Inputs
Director
I didn't know exactly how to approach the camera issue, so I created the Director class to handle multiple camera situations and scenarios. If I don't have a character to control (I don't even have a ground to land on yet) then I need at least a default camera.
Therefore, the default camera is being created as a debugging spectator camera. In the future, the Director will be responsible for creating a camera if none exists, and it can act as a manager (right now, it creates the only camera). What I mean by "manager" is that the Director can be responsible for render targets, switching camera targets, projecting/unprojecting, and so on. This is a long written way of saying; I made a class, it creates a camera that normally wouldn't exist, but I need it for debugging, and this class will still be useful in the future. Phew!
Along the way I also slightly rewritten the Inputs class, specifically the portion that involves the input bindings, and I'm glad I did. I had to expand the input binds to create keybinds for a flying camera that can ascend and descend. It went from my ugly previous mess, to establishing keybinds in this way:
std::unordered_map<int, std::string> binds = {
{ ACTION_WALK_FORWARD, "walk_forward" },
{ ACTION_WALK_BACKWARD, "walk_backward" },
// ...
};
I apologize, but I still haven't found a way on Blogger to present code with pretty colors. Once I've established myself more (remember, I started 3 days ago) I plan to share code snippets and tools with the Leadwerks Community, so I will be linking to those in the future.
A lot of future talk in this article; that means I need to push forward.
Next article will be about LUA, my classes, and "Leadwerks Ultra Engine"
Don't do what I did and start working on keybinds without a plan. I regret it, but I'm fine with the result for now. I will have to expand the "Inputs" class to work with Leadwerks::Object's and then each object can listen for key events. The current class still makes it possible to receive events for all keybinds.
My settings file now has the following added:
jump=32, 0, 0
walk_backward=83, 0, 0
walk_forward=87, 0, 0
walk_left=65, 0, 0
walk_right=68, 0, 0
These represent "key code", "control key", "shift key" and this is enough for my purposes.
I have also included mouse sensitivity settings, and Y-axis invert option. They exist only in the settings, because I haven't done anything with mouse input, but it will be added into this new Inputs class.
I did not see a way to attach to an event to a generic key event, so the Inputs class is mostly responsible for determining actions and binds based on the settings. The Game class is handling the window and input events, and emitting a action event if any of the keys bound are pressed.
Since I didn't plan anything at all before starting the Inputs class it could have been created better, but I don't care right now. In the end I needed an action map, and a binding map. Available functions at this time:
Inputs(const Settings* settings);
const std::vector<Input>& GetBinds(); // binds
const int* GetActionMap(); // action map
const int GetActionKey(const std::string& action); // get key for action
const int GetAction(const std::string& action); // get action from map
The Game class is currently responsible for determining window key actions against binds. An event is emitted when a key that is bound to an action is pressed. Next I need to capture mouse events.
I also need to work on a couple major pieces to this game: Camera, and Player.
A default Camera would work just fine for now, but later the Camera should be part of the Player. I may start with a default "Spectator" camera, because I don't always want to look around like a player. That would be a nightmare for debugging.
Milestones: Camera, Scene/Map, Player
I thought I would add a couple textures so it wasn't just white. This is by no means a representation of what the landscape will look l...